Friday, November 18, 2016

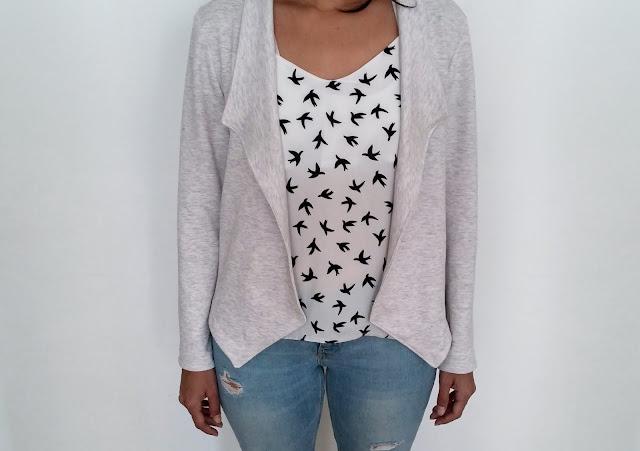
Grainline morris blazer // בלייזר

Winter and I have never been good friends, the truth is I quite hate it. I'm always cold, even when it's summer (those air conditioners!!), and when it's winter, obviously, even more. Luckily I live in Israel and the weather is usually comfortable here (by my standards), thanks to the only seasons we have here: summer and autumn, and sometimes a week of real winter (again, by my standards).

החורף ואני אף פעם לא היינו חברים טובים, אני די שונאת אותו האמת. תמיד קר לי, אפילו בקיץ (מזגנים מזורגגים), ובחורף מן הסתם אפילו יותר. למזלי אני גרה במישור החוף ומזג האוויר פה נוח בדרך כלל (בסטנדרטים שלי) תודות ל2 העונות העיקריות שיש פה: קיץ וסתיו, ושבוע פה ושם של חורף אמיתי (שוב, בסטנדרטים שלי).


Morris Blazer front

This year I decided to be more organized in terms of what I wear, and make sure to have enough clothes to keep me warm during difficult times.
Since in this time of the year it's cold in the evenings when I get home from work, I decided to focus on jackets, cardigans and so on. I saw a lot of beautiful versions of this blazer by Grainline studio and decided to start with this.


השנה החלטתי להיות מאורגנת יותר מבחינת הלבוש שלי, ולדאוג שיהיו לי מספיק בגדים שיחממו אותי בשעות קשות.
מכיוון שבתקופה הזו קר בייחוד בערב כשאני חוזרת מהעבודה, ובתוך אוטובוסים עם נהגים שלא מבינים שהקיץ עבר ולא צריך 16 מעלות במזגן, החלטתי להתמקד בג'אקטים, קארדיגנים וכדומה. ראיתי המון גרסאות יפות של הבלייזר הזה של grainline studio והחלטתי להתחיל עם זה.

Grainline Morris Blazer back

I cut size 2 as is, the only change I made was to lengthen the sleeve by 5 cm, because the pattern doesn't have pockets and I need to keep my hands warm. I bought the fabric from a random fabric store in Tel Aviv. I don't know the content of the fabric but it's some sort of a medium weight knit, very warm and cosy.

גזרתי מידה 2 כמו שהיא בלי שינויים מיוחדים, חוץ מהשרוול שהוארך ב5 ס"מ, כי לגזרה אין כיסים ואני צריכה לשמור את הידיים שלי חמות. את הבד קניתי מחנות שאני לא זוכרת את זה שמה בנחלת בנימין, אבל הוא מאוד איכותי, חמים ונעים, מזכיר את כל הקפוצ'ונים והטריינינגים שמוכרים בפוקס. 

Grainline Morris Blazer detail

It's the first time I got to deal with this kind of construction method. I usually read all the instructions before I sew to help me understand the logic behind it, but this time I just didn't quite get it, so I figured if I just roll with the instruction while sewing it will all come to place.
And it did, I made a cool blazer! 
I think i can still make some changes to the pattern to make it fit better, like taking in the shoulders, they are a little to big and make my already tiny face even tinier. 

פעם ראשונה שיצא לי להתמודד עם הרכבה כזו של גזרה. אני בדרך כלל קוראת את ההוראות שמצורפות לגזרה לפני שאני מתחילה לתפור, כדי להבין את ההגיון מאחורי ההרכבה של הגזרה, אבל הפעם לא הצלחתי להבין את השיטה, אמרתי לעצמי שכדאי שאני פשוט אבצע את ההוראות ולא אחשוב על ההגיון והכל יסתדר, ובסוף איכשהו יצא לי בלייזר לביש. לדעתי אני יכולה עוד לטפל בגזרה כדי שתתאים לי יותר, כמו לקצר טיפה את הכתפיים שטיפה גדולות עליי, דבר שגורם לפנים הקטנות שלי להראות אפילו קטנות יותר!

Grainline Morris Blazer detail

My mom and my sister already tried to steal it from me, and it actually looked better on them than me. I think  I'll just give it to one of them and make myself another one in darker color to go with everything in my closet.

אחותי ואימא שלי כבר ניסו לגנוב אותו ממני, והאמת שזה היה עליהן יפה יותר!  אני חושבת שאביא את זה לאחת מהם ואתפור לעצמי אחד חדש בצבע כהה שילך עם הבגדים שיש לי בארון.

Grainline Morris Blazer detail

Grainline Morris Blazer

Grainline Morris Blazer

Monday, October 3, 2016

Moneta dress for Rosh Hashanah (Jewish New Year) // שמלה לערב ראש השנה

ראש השנה שמח לכולם!

Happy New Year everyone!

התקופה הכי טובה בשנה הגיעה, חודש שלם של חגים וחופשים, משפחה, מתנות והרבההה אוכל. 
מתחילים כמובן עם ראש השנה (2 ימי חופש, יאי!), והשנה אפילו הספקתי לתפור לי שמלה לחג, Moneta Dress של Colette, כל כך הרבה זמן רציתי לתפור את השמלה הזו וסוף סוף הגיעה ההזדמנות. 

The best time of the year has arrived, a whole month of holidays, vacations, family, gifts and lotsss of food.
Of course we begin with Rosh Hashanah (2 days off, yay!), And this year I even managed to sew a dress for the holiday, Moneta Dress by Colette Patterns, I wanted to sew this dress for so long and finally that opportunity came.


יש לי רגשות מעורבים לגבי השמלה הזו, מצד אחד מאוד אהבתי את הגזרה, מהצד השני הבד שבחרתי לא ממש עלה על הציפיות,  הוא פשוט יותר מדי נמתח ועיוות את כל הצורה, כך שהחלק העליון של השמלה יצא ארוך מדי, למרות שקיצרתי את הגזרה לפני ב 4 ס"מ, והחלק של החצאית כבד מדי והוא מושך את החלק העליון למטה, ולכן השמלה יושבת לי מוזר על הבטן, אני בטוחה אבל שאפשר להסתיר את זה עם חגורה.

I have mixed feelings about this dress, on the one hand I love the pattern design, on the other hand the fabric I chose didn't exceeded expectations, it's too stretchy and because of that, it distorted the shape, the bodice of the dress came out too long, though I shortened the bodice by 4 cm, and the skirt is too heavy and it drags the bodice down, so the dress is hanging weirdly on my belly, but I'm sure that I can hide it with a belt.


כדי לעשות את השמלה קצת יותר מיוחדת הגדלתי את מפתח הצוואר והוספתי לה X בגב לפי ההוראות שפירסמו בבלוג של Colette. לא יצא לי מושלם, אבל פעם הבאה בטחח אשתפר. הרבה אנשים ברחבי האינטרנט התלוננו על רווח מוזר שיש באזור בית השחי, ולמרות שקיוויתי שלי זה לא יקרה, באמת היה רווח שתיקנתי על ידי הורדת 2.5 ס"מ מאזור בית השחי והשרוול, זה נראה כאילו זה פתר את הבעיה אבל עדיין יש טיפה בד מיותר באזור. למישהו יש עצה איך אמורים לפתור את זה?
גם את האורך של השמלה שיניתי, הורדתי 13 ס"מ מהאורך, כששיניתי את הגזרה עצמה, ואז עוד 5 ס"מ אחרי שמדדתי על הגוף וגיליתי שהכל נמתח למטה. 

To make the dress a bit more special I increased the neckline and added  a cross back according to this Moneta hack instructions. I know it's not perfect, but next time I'll ​​get better.
A lot of people across the web complained about a gap in the underarm area, and I had hoped that it won't happen to me,  but there really was a gap there. I fixed it by taking in 2.5 cm from the underarm and sleeves, it looks like it has solved the problem but there is still a little gap there. Does anyone have advice on how I should solve it next time?
I shortened the skirt by 13 cm from the pattern itself, and then another 5 cm after I tried it on the body and found that everything has been dragged down.


התוצאה לבישה ביותר, אני רק חוששת שהשמלה נראת קצת "סבתאית", בגלל הדפס הפרחים שבבד, אבל וינטג' באופנה לא?;) בכל אופן, אני מקווה לתפור עוד הרבה מונטות בעתיד, אבל רק בקיץ כנראה, כי אני לא לובשת שמלות בחורף.

The result is quite wearable , I'm just worried about the dress looking a little Grandma-ish, because of the floral print, but vintage is "in" right now, right? ;) 
Anyway, I hope to sew a lot Monetas in the future, but probably in the summer, because I do not wear dresses in the winter.

אז שנה טובה ומלאת הגשמה עצמית, בריאות ואושר לכולם! והידד לחגים!:)

So Happy Jewish New Year, full of self-realization, health and happiness to all! And hurray for the holidays! :)


Saturday, September 24, 2016

Ogden Cami

Hello!
I am usually very calculated person financially, but sometimes I have situations when I see something I like, and buy it no matter what the price (so maybe I'm not that calculated?), but they are usually the most successful purchases I make. This was the case with the True Bias Ogden cami.

שלום שלום!
אני בדרך כלל בחורה מאוד מחושבת כלכלית, אבל לפעמים יש לי מקרים שאני רואה משהו שאני אוהבת ואז פשוט קונה אותו לא משנה מה המחיר (אז אולי אני לא כזו מחושבת?), ובדרך כלל אלה הקניות הכי מוצלחות שלי. זה היה המצב עם הodgen cami של True Bias.

ogden cami

ogden cami inside

My cousin celebrated his 30th birthday and the whole family met to celebrate it, of course I had to sew something for the occasion, and something quick because I only had a day and a half.
I wanted to sew one last summer dress, although it's still really hot in Israel, actually there was a heat wave the day I wore it.

בן דודה שלי חגג יום הולדת 30 וכל המשפחה נפגשה כדי לחגוג לו, כמובן שהייתי צריכה לתפור משהו למאורע, ומשהו מהיר כי היה לי רק יום וחצי. רציתי לתפור שמלה קיצית אחרונה, למרות שממש חם עדיין (ואפילו היה שרב ביום שלבשתי אותה).

ogden cami

I looked for dress pattern with thin shoulder straps that I can finish in several hours. Unfortunately, I did not find something I liked, but remembered one of the new patterns from True Bias, the Ogden cami, it was exactly the style of the bodice I wanted for the dress, I assumed it wouldn't be so difficult to add a gathered skirt. So within 5 minutes, without checking any pattern reviews or what kind of fabric I will need, I bought the pattern.

חיפשתי גזרות לשמלה קצרה עם כתפיות דקות שאני יכולה לסיים בכמה שעות. לא מצאתי, אבל כן נזכרתי באחת הגזרות של True Bias והיא התאימה בדיוק לסגנון של החלק העליון שרציתי. הנחתי שלא תהיה בעיה גדולה מדי להוסיף לה חצאית כיווצים. ככה, תוך 5 דקות, בלי לבדוק ביקורות על הגזרה או אפילו לראות איזה בד צריך, קניתי את הגזרה.

ogden cami wip  ogden cami bodice

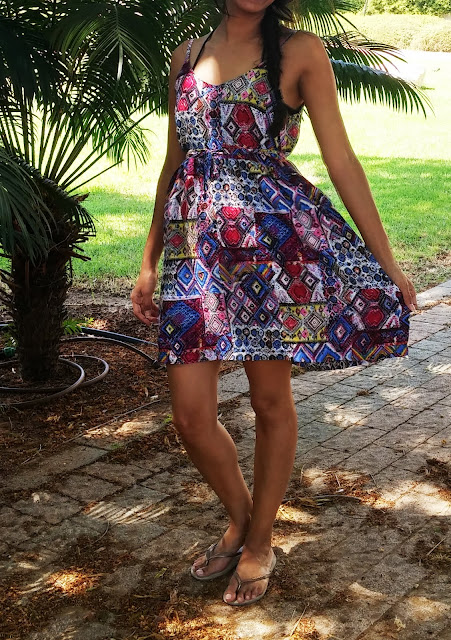
I cut size 0, based on the final measurements. I shortened the bodice on the "lengthen / shorten" line and added 1/2 "(about 1.3 cm) seam allowance, the skirt is a 144X47 cm rectangle. I added a thin belt made from the same fabric to emphasize the waist.

החלטתי לגזור מידה 0, לפי הטבלה של המידות הסופיות. קיצרתי את הגזרה בקו שמופיע בשרטוט בקו "להאריך/לקצר" והוספתי  1/2" (בערך 1.3 ס"מ) תוספת תפר, כמו שאר תוספות התפר שמופיעות בגזרה. החצאית היא מלבן שגזרתי במידות 144X47 ס"מ והוספתי כיווצים בחלק העליון. הוספתי גם חגורה דקה מהבד שתהיה לי גם האפשרות להדגיש את המותניים.

This is the first time I used a True Bias pattern, the instructions are simple and clear, and the pattern is well drafted. Within a few hours I had a perfect summery dress, made from a happy colorful fabric, which cost me only 15 NIS (approximately 4$) for a meter and a half.

זו הפעם הראשונה שאני משתמשת בגזרות של True Bias אז לא ידעתי למה לצפות. הגזרה משורטטת מצויין וההוראות היו פשוטות ומובנות ותוך כמה שעות כבר הייתה לי שמלה קיצית מושלמת מבד צבעוני ושמח שקניתי רק ב15 ש"ח למטר וחצי מחנות רנדומלית בנחלת בנימין.

I received a lot of compliments, and I can't wait to wear it again, I hope the weather will approve!

קיבלתי עליה המון מחמאות וכבר בא לי ללבוש אותה שוב, מקווה שמזג האוויר יאשר! 

ogden cami

Am I the only one who succumb to the childish need of buying things I want right here right now?

אני היחידה שנכנעת לפעמים לצורך הילדותי לקנות דברים כי בא לי עליהם כאן ועכשיו? 

Friday, September 16, 2016

The Refashioners 2016! // מיחזור ג'ינסים


The amount of jeans I own is crazy, lots of different models and colors.
The amount of unused jeans I own is crazy, tears, holes, torn belt loops, jeans that are too small, jeans that are too big and some I got sick of. But there's something inside me that makes me keep them, especially since I started sewing, I tell myself I'll fix them one day, but I'm so lazy and never get around to it, and once loved jeans are now thrown in the bottom of the closet.

כמויות הג'ינסים שיש לי בבית הן מטורפות, מלא דגמים וצבעים.
כמויות הג'ינסים שיש לי בבית ולא בשימוש הן מטורפות! קרעים, חורים, לולאות חגורה קרועים, ג'ינסים קטנים מדי, ג'ינסים גדולים מדי והאמת שכמה שפשוט נמאס לי מהם. אבל יש משהו בתוכי שגורם לי לשמור אותם, בייחוד מאז שהתחלתי לתפור, הייתי אומרת לעצמי שאני אתקן אותם יום אחד, אבל אני כזו עצלנית שמעולם לא הגעתי לזה והג'ינסים הנחמדים שפעם כה אהבתי זרוקים להם בחלק התחתון של הארון.

An urgent need to tidy up my house attacked me (it happens once every two years or so) and I decided to fold all the clothes we own, mine, my husband's. Everything. We both are hoarders of clothes... and socks, we have a lot of socks. So I sat the whole friday afternoon folding clothes. And tried on all my old jeans to see what fits and what does not and to get rid of them for good. Because most of them were in good condition I decided to donate them and put them all in a bag, waiting for the day I will have the power to do something about it.

ואז, ביום אחד בהיר של התקף סדר (שתוקף אותי פעם בשנתיים בערך) החלטתי לקפל את כל הבגדים בבית מחדש. שלי, של בעלי. הכל. שנינו סוג של אוגרים כפייתים של בגדים. וגרביים, יש לנו המון גרביים. אז ישבתי אחר הצהריים שלם של יום שישי וקיפלתי בגדים. ומדדתי גם את כל הג'ינסים שלי, לבדוק מה מתאים ומה לא ולהפטר מהם סופית. בגלל שרובם היו במצב טוב החלטתי לתרום אותם ושמתי אותם בשקית בצד עד ליום שיהיה לי כח לעשות עם זה משהו.

When I saw the Refashioners 2016 challenge on the makery blog I knew this was the perfect opportunity to do something with these jeans. The aim of the challenge is to use old jeans and use their fabric to create something new to wear or use, but I wasn't sure I wanted to participate.
The next day, to my surprise, I kept thinking about the challenge. I started looking for inspiration on Pinterest and decided I wanted to create something to wear. My fear was to sew something that looks too much like...well, jeans. The goal for me was that at first glance no one would understand that the garment was made from old jeans. When I got home from work that day I tore violently the garbage bag in which were all the clothes I was going to donate, and spread the jeans it contained according to shades.

כשראיתי את התחרות בבלוג Makery ידעתי שזו ההזדמנות המושלמת לעשות משהו עם הגינסים האלה. המטרה של התחרות היא להשתמש בג'ינסים ישנים ולהשתמש בבד שלהם כדי ליצור משהו שכן נלבש, או נשתמש בו, אבל עדיין לא הייתי בטוחה שאני רוצה להשתתף. 
למחרת, להפתעתי, לא הפסקתי לחשוב על התחרות. באוטובוס בדרך לעבודה התחלתי לחפש השראה בפינטרסט והחלטתי שאני רוצה ליצור משהו שאוכל ללבוש. הפחד שלי היה לתפור משהו שנראה יותר מדי כמו ג'ינס משומש. המטרה מבחינתי היתה שבמבט ראשון אף אחד לא יבין שהבגד נעשה מבגדים ישנים. כשהגעתי הביתה אחרי העבודה באותו היום קרעתי את שקית הזבל שבתוכה היו כל הבגדים שהתכוונתי לתרום ופרשתי את כל הג'ינסים שהיו שם, לפי גוונים.


I got an idea thanks to this arrangement by shades to create a kind of ombre effect on the item I'm going to make, at this stage I did not even know what it would be. I drew a quick sketch and came up with something like this:

הסדר הזה לפי הגוונים העלה לי רעיון ליצור סוג של אומברה בפריט שאני מתכוונת לתפור, שבשלב זה אפילו לא ידעתי מה הוא יהיה. התחלתי לשרטט ויצא לי משהו כזה: 


In terms of fabric I didn't have too much material to work with because I like my pants skin tight, and to avoid the too jeans-y appearance, I was not going to use the front and back of the pant leg when they are connected together, the side seam will reveal to everyone what this garment was before.

מבחינת הבד לא היו לי חלקים רחבים מדי כי אני אוהבת את הגינסים שלי צמודים צמודים, וכדי למנוע את המראה הג'ינסי לא התכוונתי להשתמש בחלק הקדמי והאחורי של המכנס כשהם מחוברים יחד, התפר צד יגלה לכולם מה הבגד הזה היה לפני.

I drafted the skirt pattern myself, and I even did a muslin to check the fit. Luckily everything went smoothly. All that was left was to decide how to create the stripes effect. I had two options:

1. Cut long strips of fabric and attach them, and use it as a normal fabric.

2. Divide the pattern itself to the wanted number of stripes, add seam allowance and attach them together to create the shape of the pattern.

את החצאית שירטטתי בעצמי, ואפילו עשיתי תפירת מבחן עם בד מיותר כדי לבדוק אם המידות מתאימות. למזלי הכל הלך חלק. כל מה שנותר היה להחליט איך ליצור את האפקט של הרצועות. היו לי 2 אופציות:

1. לחתוך רצועות בד ארוכות ולחבר בינהם. בעצם ליצור בד שלם ולהשתמש בגזרה איך שהיא.

2. לחלק את הגזרה למספר החלקים הרצויים, להוסיף תוספת תפר להכל ולתפור מהם את הגזרה של החצאית.

I was not sure the first method would work, I was afraid I would not have enough fabric to match the stripes later. In the end I went for the second method, because I knew I won't have any surprises.

הבעיה עם השיטה הראשונה שהיא לא חסכנית מדי בבד, לא הייתי בטוחה שהרעיון יעבוד, פחדתי שלא יהיה לי מספיק בד כדי להתאים את הדוגמא של הפסים. בסופו של דבר הלכתי על השיטה השנייה שיהיו בה בדיוק את כל החלקים שאני צריכה.


Cutting and attaching the stripes passed easily, except that I added a dart in the back of the skirt, which I shouldn't have done, because it was the most challenging part of the stripes sewing. I had to match every stripe dart seam to the next dart seam. Somehow I managed to do it for the 6 stripes that had part of a dart and created a continuous line for the darts.

לחתוך ולחבר את הרצועות עבר בקלילות, חוץ מהעובדה הקטנה שהוספתי מתפר בחלק האחורי של החצאית (בקדמי הורדתי אותו), שכנראה לא הייתי צריכה לעשות כי זה היה החלק הכי מאתגר בתפירה של החצאית. הייתי צריכה בכל רצועה לתפור את החלק של המתפר ורק אז לחבר כל חלק, כך שהייתי צריכה להתאים כל תפר של מתפר לתפרים האחרים. איכשהו הצלחתי לעשות את זה ל6 חלקים שהיה בהם מתפר וליצור קו ישר והמשכי לכל חלק פאנל.


I closed the skirt with a 15 cm zipper and fortunetly I put it on without a problem.

סגרתי את החצאית עם רוכסן של 15 ס"מ, לא היה לי ארוך יותר ולמזלי החצאית עלתה על הגוף ללא בעיה.

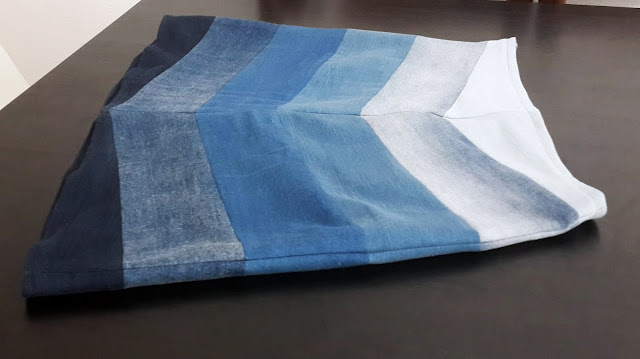
In the end I think I made a skirt that can be worn every day and does not look too much like dead jeans ;) and I like it!

בסופו של דבר נראה לי שיצרתי חצאית שאפשר ללבוש ביום יום והיא לא נראת יותר מדי כאילו היא עשויה מג'ינסים מתים. ואני די מחבבת אותה!


I was so happy the skirt exceeded expectations and really looks like the drawing I designed.
But I ignored one important thing , I still have lots of fabric leftovers! I murdered in cold blood six jeans and did not use most of the material?!
No, I will not let it happen! At first I thought to create a crop top to go with the skirt, but when I pictured myself wearing it, I realized it was too costumy for my taste.

הייתי כל כך מאושרת שהחצאית עלתה על הציפיות ובאמת נראת כמו השרטוט שעיצבתי שהתעלמתי מדבר אחד חשוב- נשאר לי עוד מלאאאא בד לא משומש! רצחתי בדם קר 6 ג'ינסים ולא השתמשתי לפחות ברוב החומר שנוצר?
לא, אני לא אתן לזה לקרות! בהתחלה חשבתי ליצור קרופ טופ שילך עם החצאית אבל כשדמיינתי את עצמי לובשת את זה, הבנתי שזה יותר מדי ,תחפושתי בשבילי.


I finally decided not to sew something for myself, but for my house, thus creating this cushion:

בסוף החלטתי לא לתפור משהו לעצמי, אלא לבית שלי! וכך נוצרה הכרית הזו:


I had this idea to create a diamond shape pieces, connect them and create an interesting pattern, I calculated how many diamonds to create, to fit the size of the pillow form I have. I needed 37 diamonds for the front and the back.
I created a 21x14 cm diamond shaped pattern and cut the wanted number of diamonds from each jean shade I had.
I arranged them first the way I wanted to sew them and then sewed each piece together to form 3 rectangles. I followed the steps of this tutorial and created beautiful cushion, and it's just perfect for my living room.

עלה לי רעיון ליצור מעויינים, לחבר אותם וליצור דוגמא מעניינת, חילקתי את כמות המעויינים לפי הגודל של הכריות שיש אצלי בבית יצא שאני צריכה 37 מעויינים לחלק הקדמי והאחורי.
יצרתי שבלונה של מעויין בגודל 14x10 (לבדוק) וגזרתי מכל גוון של גינס את כמות המעויינים הרצויה. 
סידרתי אותם בצורה שאני רוצה לתפור אותם ותפרתי חלק חלק עד שנוצר לי ריבוע בגודל של הכרית כולל תוספת תפרים. עשיתי את השלבים של המדריך הזה ויצרתי כרית לתפארת! והיא פשוט מושלמת לסלון שלי.


The Refashioners challenge was very enjoyable and very challenging for me, and I'm glad that I took part :)

התחרות הזו היתה ממש מאתגרת ומאוד מאוד מהנה בשבילי, ואני שמחה שלקחתי חלק בזה.

Friday, August 19, 2016

Moana Top/Dress

היי לכולם!
אחד הדברים שמצליחים להרגיע אותי הוא הים, בייחוד כשהוא ריק מאדם ולקראת השקיעה.
ועוד דבר שמרגיע אותי הוא תפירה. שני הדברים האלו מצליחים להשכיח ממני את הכל. 
אז מה יותר טוב מלשלב את שניהם (בערך..)?

Hello everyone!
One of the things that makes me feel relaxed is the sea, especially when it's empty and close to sunset. Another thing that relaxes me is sewing, so what's better then combining them both (sort of...)?


שמלת/חולצת "Moana" של Papercut Patterns היא החולצה המושלמת לקיץ, כל כך אוורירית ומתוקה. השם של החולצה נגזר מהמילה "ים" במאורית (שפת הילידים המקוריים של אוסטרליה-לבדוק). החלק התחתון שלה מעוצב כך שיזכיר גלי ים.
זו הגזרה השניה שיוצא לי לתפור מהחברה הזו ובנתיים אני מרוצה מאוד וכנראה אעשה עוד בהמשך (שמתי עין על השמלה הנחמדה הזו). למי שלא מכיר, papercut patterns היא חברת גזרות מניו זילנד, ההוראות כתובות באנגלית, אבל אני מאמינה שהכל די ברור מהתרשימים המאוד טובים שלהם. 

Moana top by Papercut Patterns is the best summer top, so airy and sweet. "Moana" means "sea" in maori and its design reminds me of sea waves. It's the second Papercut Pattern I made and I'm really pleased with the design and fit, and probably sew other Papercut patterns in the future (I got my eyes on the YoYo dress/skirt).

הבד שהשתמשתי בו הוא בד מסתורי, המוכרת לא ידעה להגיד לי ממה מורכב הבד, אבל הוא מזכיר את הבדים שיש בבטנות של מעילים. הוא אפילו עושה את אותם הקולות, והוא חלקלק בטירוף! אז הייתי צריכה לעשות מספר הכנות כדי שאוכל להתמודד איתו. קראתי כמה מאמרים ברחבי האינטרנט וצפיתי במיליון מדריכי וידאו.
השתמשתי בסיכות ובמשקולות כדי להחזיק את הבד וגזרתי עם סכין גלגלת כדי למנוע תזוזות מיותרות. כמעט כל המדריכים באינטרנט המליצו להשתמש בנייר עטיפה של מתנות כדי ליצור חיכוך בין הבדים, אבל בגלל שלא היה לי השתמשתי בנייר של עיתון וזה עבד נפלא.

I used a mystery fabric, the lady in the fabric store couldn't identify it, but It's like lining fabric, a bit shiny, makes the same sound and slippery as hell! I had to make a few preparations to handle it like reading a bunch of tutorials and watching gazillion video tutorials.
I used pins and weighs to hold the fabric in place and cut with a rotary cutter. Almost every tutorial suggested to use wrapping paper, I didn't have any so I used newspaper instead and it worked great!

גזרתי מידה XXS בחזה ושילבתי למידה XS במותניים וביריכיים והורדתי 4 ס"מ מהעורף כי היה לי שם עודף רציני של בד, דבר שקורה לי בכל גזרה שאני מכינה, מה לא בסדר עם הגב שלי לעזאזל?!

I made size XXS in the bust and graded to XS in the waist and hips. I also took 4 cm from the back neck because I had a serious gap there, something that happens to me in every pattern I ever made, what the hell is wrong with my back?! 


התפירה עצמה עברה ללא בעיות. השתמשתי ברגל הולכת במכונה בפעם הראשונה והבד פשוט החליק לו בקלילות ללא התכווצוויות והחלקות מיותרות, עכשיו אני מבינה את הקסם מאחורי התוסף הקטן הזה.

The sewing itself went problem free. I used a walking foot for the first time ever and the fabric went through easily, no slipping or puckering! yay! now I understand the magic behind this little attachment.

מאוד אהבתי את הגזרה ואני כנראה אכין עוד גרסאות שלה, אולי עם בד סריג הפעם ובלי הרוכסן מאחורה.

I really REALLY like this pattern and will make a few more, maybe with knit fabric this time and no zip.


איך היתה הפגישה הראשונה שלכם עם בדים מחליקים? אולי יש לכם טיפים לחלוק?:)

how was your first meeting with slippery fabric? do you have and tips to share?


Saturday, July 23, 2016

Hello! + Refashion // שלום! + מיחזור בגדים

Follow my blog with Bloglovin
שלום לכולם! (על מי אני עובדת בטח אני מדברת לעצמי..)
קוראים לי עדי ואני אוהבת ליצור דברים. לפני שלוש שנים רכשתי את מכונת התפירה הראשונה שלי אחרי שראיתי סרטון ביוטיוב שממש גרם לי לרצות ליצור משהו מבד ומאז אנחנו בלתי נפרדים. חוץ מכמעט כל יום שאני צריכה ללכת לעבודה, אז אנחנו תכלס בלתי נפרדים רק בשבתות. וגם אז אם אני בבית ולא אצל ההורים. לא משנה הרעיון הוא שאני מאוד אוהבת לתפור ומנצלת כל שניה פנויה כדי לעשות משהו שקשור בזה, גם אם זה לא פעולת התפירה עצמה, כמו מדריכים ביוטיוב, ספרי תפירה או סתם לחלום על זה.

 Hello everyone!
My name is Adi and I like to create stuff. 3 years ago I watched a pouch making youtube video that made me want to make something out of fabric, so I purchased my first sewing machine and since then we are inseparable. Except almost everyday I have to go to work. so we are inseparable only on the weekends. and only if I'm not at my parents house. Anyway the idea is I really like to sew and I spent every free moment I have on sewing, or something related, even if its doesn't involve a sewing machine, like tutorials, books or just thinking about it.

טוב אז לעניין שלשמו התכנסנו: בגדים!

הפרוייקט הראשון לבלוג זה הוא מיחזור(או בשמו האמיתי-דברים בחינם)! 
לפני שנים כשהתחלתי לתפור וסיפרתי על זה  לעולם התחילו בקשות כמו "תעשי לי מכפלת" או "תתפרי לי כפתור" או "יש לי כתם מגעיל של עט שהתפוצץ על חצאית שבדיוק קניתי את יכולה לקצר לי אותה?", ואני כאדם הטוב שאני הסכמתי להכל בתקווה שהם ישכחו מזה ואני אוכל לחזור לתפירה האגואיסטית שאני כל כך אוהבת. רוב האנשים באמת שכחו מזה. חוץ מאחותי שאתם מכירים מהציטוט על החצאית שהשאירה אותה בביתי הקט לתיקון עתידי.
באמת התכוונתי לתקן את זה, זה היה יכול להיות אימון טוב למכפלות אבל לא יצא לי לעבוד על זה. שנים לאחר מכן החצאית האדומה היפה עדיין אצלי בארון נטושה לה ואני מנסה לעבוד על יצירת הגזרות שלי אחרי שסיימתי קורס בבית הספר של אילנה לשרטוט גזרות בשיטת AB. הבד שרציתי להשתמש לצורך התפירה היה בד סריג אפור יפה שקניתי באחד מהחנויות בנחלת בנימין לפני שנה. זכרתי אותו בד אווירירי וקליל שמתאים לחום המטורף בישראל אבל כשהוצאתי אותו מהארון גילית שהוא טיפה עבה מדי לחודש יולי. פשפשתי עוד קצת במצבור הבדים הצנוע שלי ומה התגלה לי? החצאית האדומה עם הבד האדום המושלם! מהר מהר פרסתי אותה על השולחן ובלב התפללתי שיש בה מספיק בד. למזלי היה מספיק בול לחולצה הפשוטה שרציתי ליצור.

so lets get to what we're all here for: clothes!

My first project for this blog is refashion! (or its real name - free stuff!)
years ago when I started sewing and told everyone about it several requests have started to come, like "sew me a button" or "shorten my hem" or "I have an ugly stain on my new skirt can you shorten it?". and the good friend I am I said yes to all while wishing they'll forget about it and leave me to my selfish sewing. Most people did forget about it, except for my sister you all know from the stain quote who left the skirt at my house for future mending. I really did plan to fix it for her. I thought it would be a good hemming practice, but I never got to it. Years later the pretty red knit skirt is still waiting abandoned somewhere in my sewing room and I try to work on my pattern making skills after I finished a pattern making course.
I needed a knit fabric for the pattern I drafted and the fabric I thought to use was way too thick for the hot summers we have here in Israel. I searched again in my fabric stash for something light and airy and what did I find?? the knit skirt! it was perfect! I prayed the pattern pieces would fit in it, AND IT DID!!


ואז התחילו רגשות האשם.
זה לא שלי אני לא באמת יכולה לעשות משהו עם זה! אבל אחותי בטח לא זוכרת את החצאית הזו אחרי 3 שנים! יצר הרוע השתלט והחלטתי כן להשתמש בה. מקסימום אם היא תגלה אני אתפור לה חצאית אחרת, או סתם אתחנף עד שתסלח לי. עדיף לבקש סליחה מאשר לבקש רשות, לא?;) (סליחה ניצן!)
פרמתי את כל החצאית. חוץ מאת המכפלת שהחלטתי להשתמש בה למכפלת של החולצה כדי לחסוך לי זמן ועבודה. היא היתה מורכבת משני פנלים של בד וחגורה עם גומי עבה. ממש פשוטה. 


And then, the guilt feelings rushed in. its not really mine I can't use it, but she probably don't even remember it after 3 years. If she'll discover it I will make her a new one, or beg for forgiveness. In the end I decided to use it.
Better ask for forgiveness than ask for permission...right?;)
The skirt was made of 2 panels of fabric and an elastic waistband. I ripped the whole skirt, but left the hem as is to save me some time and work.


הגזרה שיצרתי היא חולצת T פשוטה. בגזרה יש סה"כ 4 חלקים. חלק קדמי, אחורי, שרוול קצר וצווארון (שנוצר כרונולוגית  אחרי התמונה הזו).

The pattern I created is a simple t shirt. It has only 4 pieces: front, back, sleeves and a neckband (which was created after this photo;) )


את הצווארון חישבתי שיהיה קצר ב-5 ס"מ מהאורך הכולל של פתח הצוואר בחלק הקדמי והאחורי כפי שנהוג לעשות בסריגים כדי שהצווארון ישב יפה מסביב לצוואר, והאמת שזה הצווארון הכי יפה שיצא לי לעשות עד כה בבד סריג. 
בתפרי צד עשיתי פתח קצת מתחת למותניים שיתן משהו מעניין לחולצה הסופר פשוטה הזו.
הגזרה של השרוולים יצאה לי קצת גדולה יותר מההיקף של בית השחי ויש קצת קפלים בכתפיים. אבל לא נורא. אסתיר את זה עם השיער כי אני פשוט אוהבת את החולצה הזו ושום דבר לא יעצור אותי מללבוש אותה!


I made the neckband 5 cm shorter then the overall length of the neck opening so it'll sit nice and smooth on the neck, and it is actually the best neckband I ever made in a knit. I decided to make the shirt more interesting by sewing the side seam a few cm away from the hem to create a slit on the sides. The sleeve pattern was way larger the the armhole opening so I have a few gathers on the shoulder, but its ok I can hide it with my hair because I love this shirt so much and nothing will prevent me from wearing it!


אז מה איתכם? ביצעתם פעם פשעי תפירה? ואם כן, מישהו גילה על כך?

So what about you? Did you make sewing crimes in your life? If you have, did someone find out?

Oh, by the way if you are wondering what's my blog name means, in Hebrew "ha toferet" is "the seamstress".